A lot of people with perfect computers can't upgrade to Windows 11. When Microsoft releases the latest version of Windows, it imposes some strict minimum system requirements, the most stringent of which is TPM 2.0 support. A lot of people have PCs with older versions of the Trusted Platform Module (TPM), or premium gaming consoles that lack TPM entirely, which means Windows 11 is beyond their reach. However, there is an easy way to bypass the TPM check and install Windows 11 on your PC.
Risks of installing Windows 11 on an unsupported computer
Let me start by stating the obvious: upgrading a low-end PC to Windows 11 is not a good idea. Microsoft requires at least 4GB RAM and 64GB free space to install Windows 11, if your PC does not have these conditions, you should avoid this upgrade. This guide is primarily intended for users who have a fully functional computer but are unable to upgrade to Windows 11 due to TPM limitations.
Microsoft's main reason for pushing TPM is to improve security. PCs with TPM are more resistant to malware and ransomware attacks and can store sensitive data locally in a more secure manner. The company says that if you install Windows 11 on an unsupported PC, you may face compatibility issues, may not receive support from Microsoft, and may experience poor performance. We also warn you that any damage to your computer is not covered by the warranty.
If your computer is under warranty, it is recommended that you do not tamper with it. However, if the warranty has expired, you may want to consider upgrading it to Windows 11 as another deadline is approaching. Microsoft announced that it will stop updating these computers starting on October 14, 2025.
What to expect after the last Windows 10 security update
After the latest security update is released, it is strongly recommended that you do not use your computer on the Internet. You'll be vulnerable to new malware, viruses, and other threats from the Internet, and no real security patch can protect you.
You do have the option to pay for updates as part of the Microsoft Extended Security Updates (ESU) program, but it's an expensive proposition. For businesses, the cost per device is $61 in the first year, with the price doubling each year thereafter. Microsoft hasn't revealed pricing for these updates for individual users yet, but if you're part of an educational institution, pricing will start at $1 per device per year, rising to $4 per year in the third year.
If ESUs are reasonably priced for home users, it might be a good idea to stick with Windows 10. However, if you have a valid Windows 10 license, you can upgrade to Windows 11 for free, and many users will receive free security updates over the next few years.
How to upgrade an unsupported PC to Windows 11
Before proceeding with the upgrade, be sure to back up your computer. You don't want to lose all your data during the upgrade, so make sure all irreplaceable data, such as photos, videos, and documents, are stored securely elsewhere. When all of this is complete, you can begin the upgrade process. First, download the Windows 11 ISO from the Microsoft website. On that page, scroll down to Download Windows 11 disk image (ISO) for x64 devices , select the version from the drop-down menu, and click Download now . Follow the instructions until the option appears to click "64-bit Download." The ISO file is over 6GB and will take a while to download.
During this process, you should download Rufus, a free tool that allows you to create a bootable USB drive. You will also need a USB drive with at least 8GB of free space. If you have one of these, please take a moment to back up any important data on that drive, as it will be deleted as we proceed.
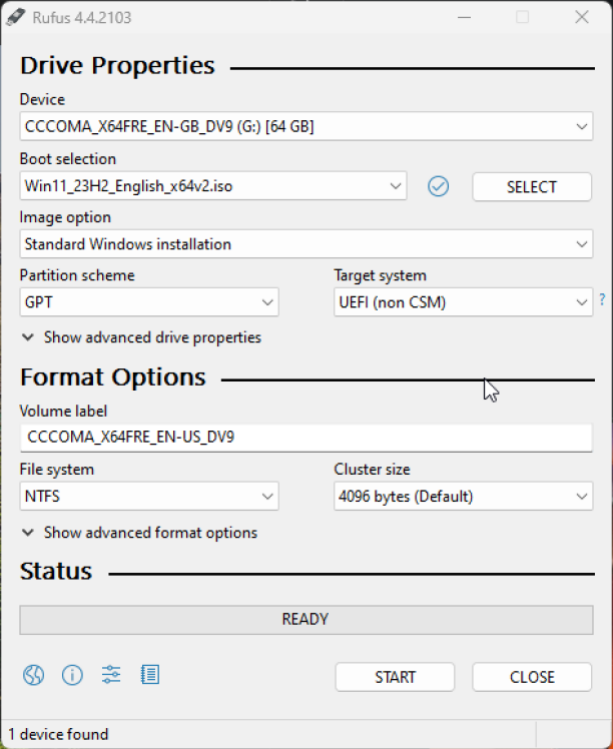
After downloading the Windows 11 ISO, insert the USB drive, then install and launch Rufus. After opening this application, go to the "Device" drop-down menu and select the correct USB drive. Click the large selection button next to Disk or ISO image and select the Windows 11 ISO you just downloaded. Now, click on the "Start" button.
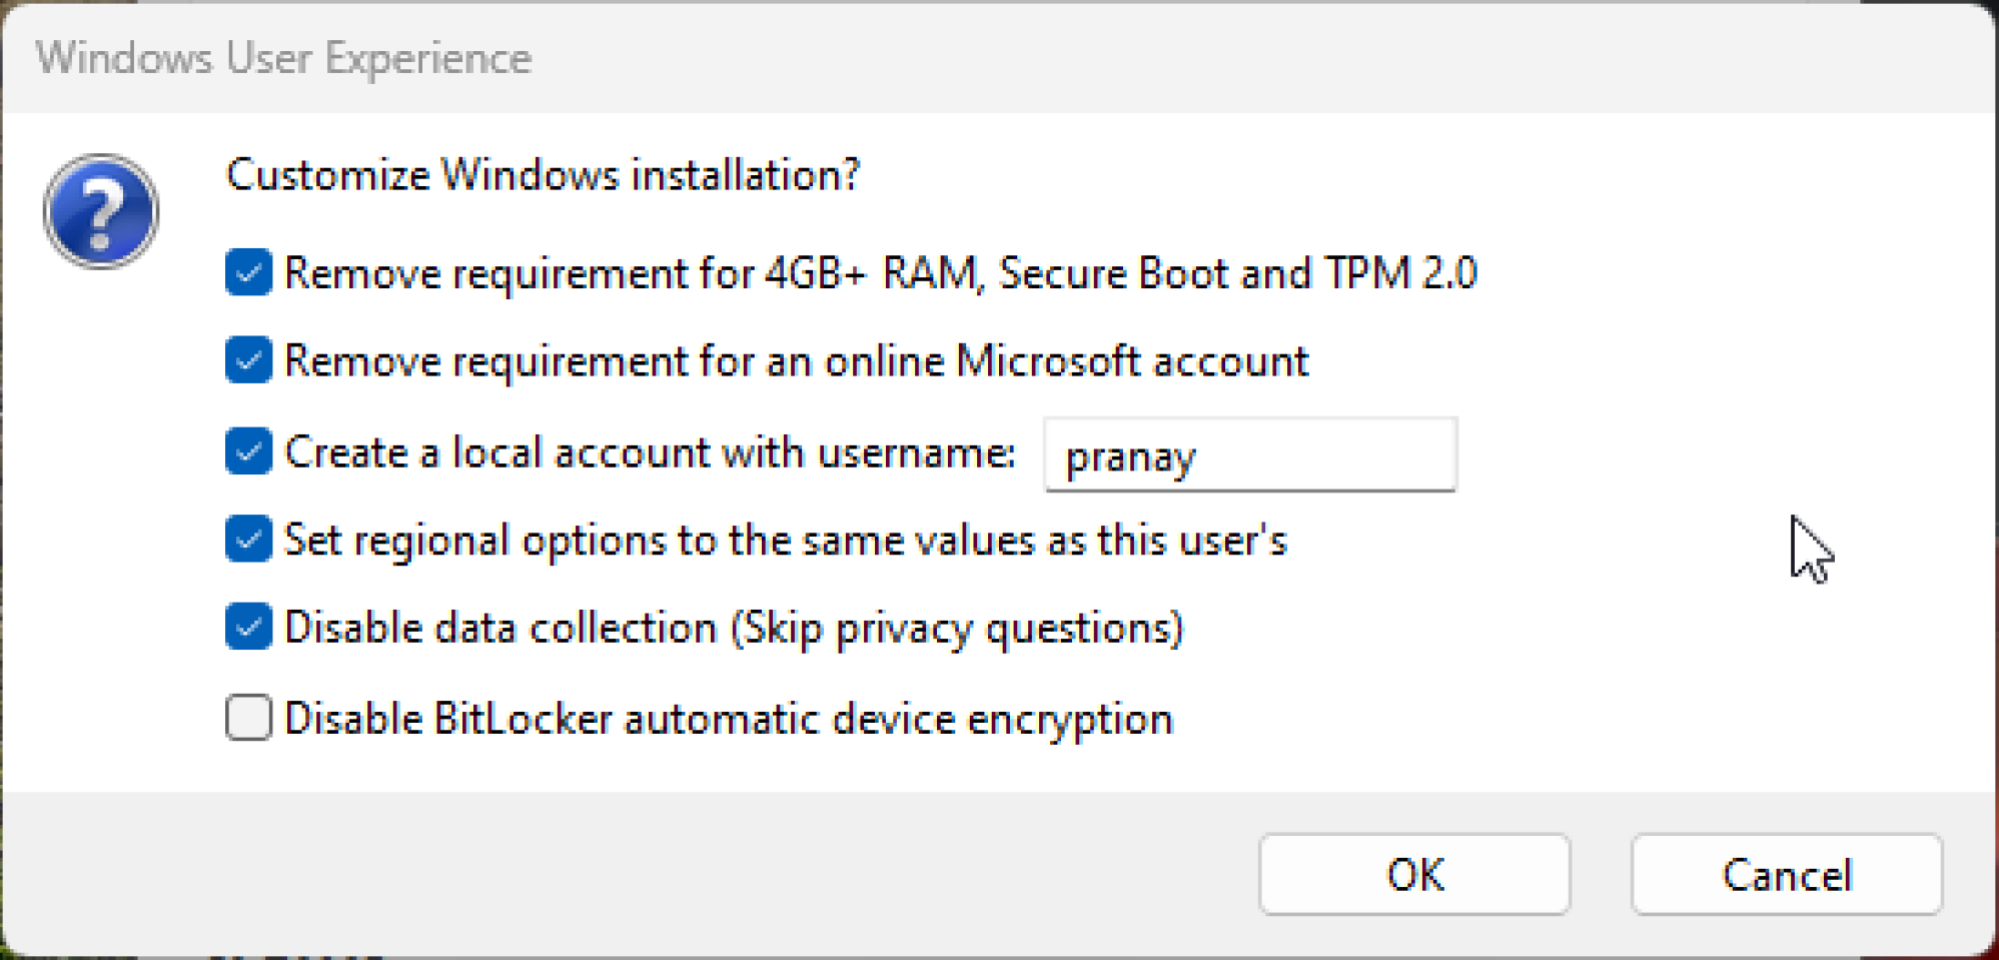
You will see a pop-up window asking if you want to customize your Windows installation. Ideally you should enable the following options here:
Removed requirements for 4GB+ RAM, secure boot and TPM 2.0
Remove requirement for online Microsoft account
Create a local account using username
Disable data collection (skip privacy questions)
If you want to install Windows 11 on an unsupported PC, the first option is crucial. The rest are good because they let you skip the online account sign-in process that Microsoft has been trying to push, and they also skip some of the annoying setup issues around data collection. With all of these selected, click OK and wait for Rufus to do its thing.
Once completed, double-check that your data is backed up and you're ready to start the upgrade. On a Windows 10 PC, go to Settings > Update & Security > Recovery and click Restart now under the Advanced Startup section. This will restart your computer and start the Windows 11 installation process from the USB drive.
I successfully upgraded my computer to Windows 11 using this method and only encountered one minor issue. When the computer restarts for the first time during the upgrade process, you should remove all USB drives from the computer (including Windows 11 USB drives). Otherwise, the installation may get stuck. Other than that, the upgrade process went smoothly and I can now happily run Windows 11. I didn't need to do anything to activate it either. I skipped the step that asked me to enter my product key and noticed that Windows 11 activated itself after installation. After upgrading, my Windows 10 Pro key automatically activates Windows 11 Pro.
